A window is not just glass in a wall. It is a joint between the window unit, the rough opening, the air barrier, the water-resistive barrier, insulation, trim, and cladding. When that joint is handled loosely, drafts and leaks often show up long after the installer has left. Some failures are obvious on day one. Others wait for winter, wind-driven rain, or the first season when the house shifts a little. A neat finish can hide a weak installation for quite a while.
One point matters early: air leakage, water intrusion, and condensation can look similar from across the room. They are not the same problem, and treating them as one often leads to the next mistake.
Why This Job Gets Risky Faster Than It Looks
Window work feels straightforward because the finished product is familiar. A frame goes in, the gaps get sealed, the trim returns, and the room looks done. Yet the weak point is rarely the glass itself. It is the transition zone where the new unit meets the existing wall.
That transition has to do several jobs at once:
- stop uncontrolled air movement
- let incidental water drain back out
- tolerate seasonal movement without opening gaps
- stay aligned so the sash, locks, and weatherstripping still work
- connect correctly to the WRB, flashing, drip cap, and interior air seal
A window is not a picture frame. It is a managed opening in the weather shell.
Common Assumptions That Start The Trouble
Many failures begin with a reasonable-sounding assumption that turns out to be false under real weather conditions.
- A premium window will protect itself. A good unit can still leak if the sill pan, flashing sequence, or rough opening seal is wrong.
- Caulk can make up for missing details. Caulk helps, though it is not a drainage plan and it is not a substitute for flashing.
- Insert replacement and full-frame replacement solve the same problems. They do not. If the old frame, surrounding trim, or wall interface is already failing, an insert may hide the problem rather than remove it.
- If the window opens and closes today, the install is fine. A unit can operate on day one and still be slightly out of square, over-foamed, or poorly flashed.
- Stuffing insulation into the gap counts as sealing. It may reduce heat flow, yet it does not automatically stop air leakage.
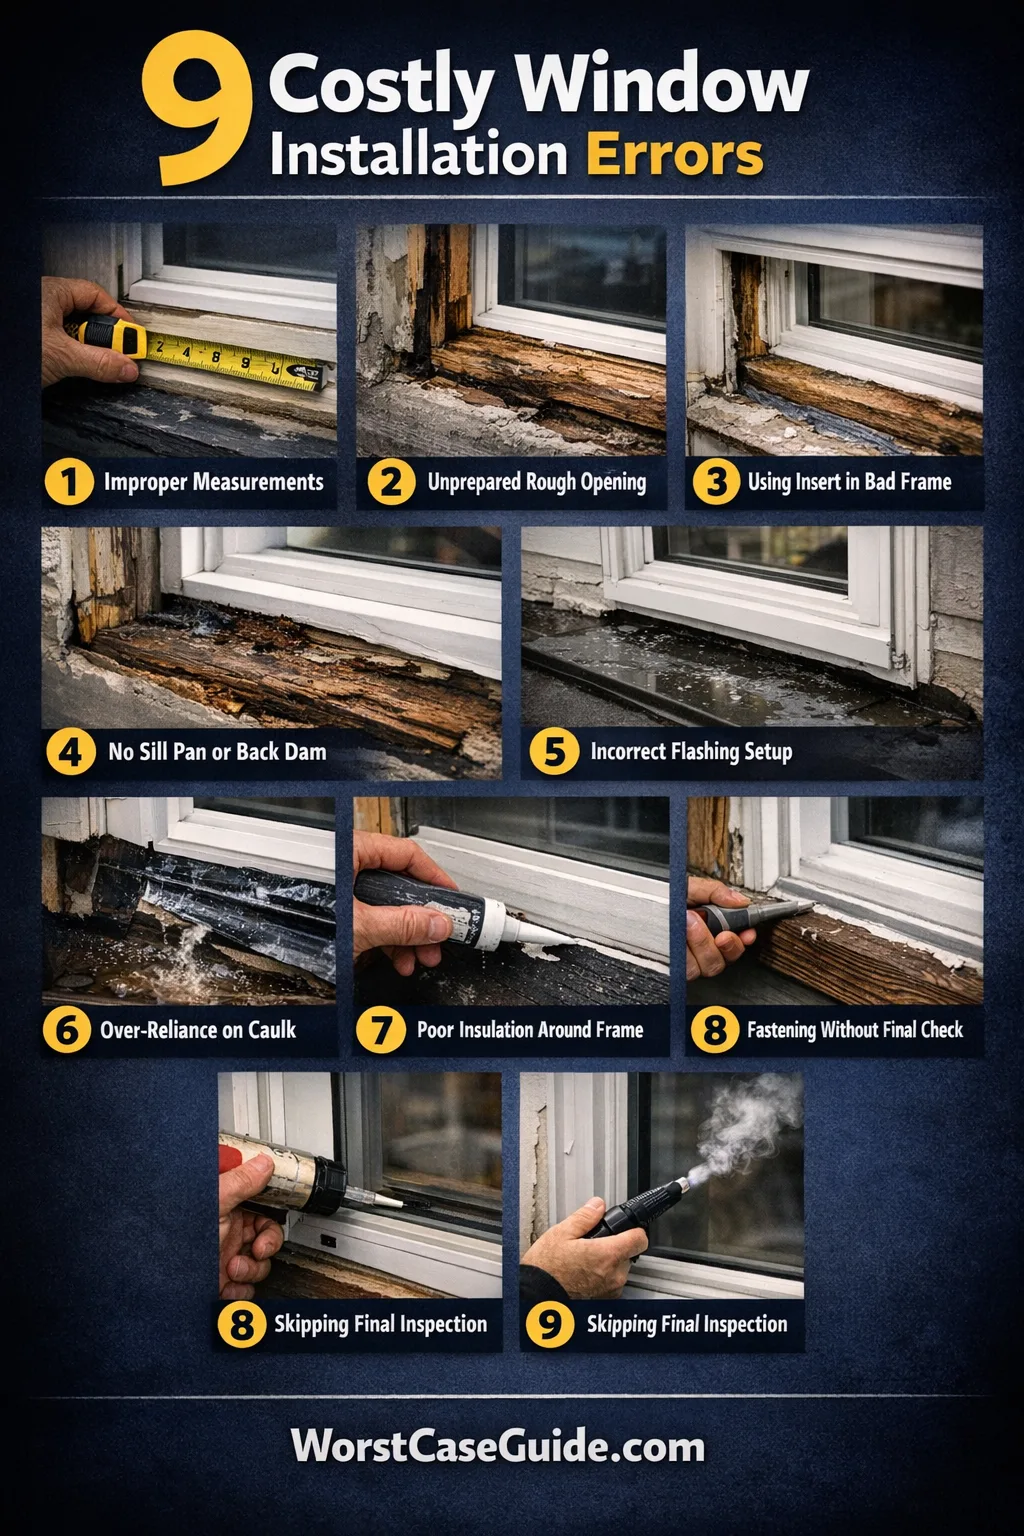
9 Window Installation Mistakes That Cause Drafts And Leaks
Mistake 1: Measuring The Opening As If It Were Perfectly Uniform
Why It Happens
Older openings are rarely consistent from corner to corner. Installers sometimes measure width and height once, then order or fit the unit around a number that looks close enough. In real houses, the rough opening may be out of square, bowed, or built up by layers of old paint, shims, capping, or patched trim.
Early Warning Signs
- uneven reveal lines around the frame
- one corner needing much more sealant than the others
- a sash that feels tighter at the top than the bottom
- trim that hides a noticeably wider perimeter gap on one side
Worst-Case Outcome
The joint ends up carrying too much of the correction. That often means oversized caulk joints, compressed shims, distorted weatherstripping, and gaps that move with temperature changes. Air leakage may show up first. Water entry may follow later, especially on the side that took the most correction.
Safer Approach
A more reliable path is to treat measurement as a set of conditions, not one number: width at multiple points, height at multiple points, diagonal checks, sill condition, jamb depth, and any sign that the old frame is already twisted. In smaller projects, that may reveal that a simple insert is still reasonable. In larger systems, it may point toward a fuller opening repair before the new unit goes in.
Mistake 2: Assuming The Rough Opening Is Level, Plumb, And Dry Enough To Receive A New Window
Why It Happens
Once the old unit is out, the pace of the job often speeds up. There is pressure to set the new window quickly so the house is not left open. That is exactly when an installer may skip checking the sill, jambs, and head for level, plumb, square, rot, swelling, or wet sheathing.
Early Warning Signs
- shims stacked heavily in one corner
- a head gap that changes from one end to the other
- soft or darkened framing at the sill
- old fastener holes, crumbling sheathing, or stained underlayment
Worst-Case Outcome
The window may be forced into an opening that is already failing. That can produce persistent drafts, binding hardware, water reaching concealed framing, and slow deterioration around the sill. The window gets blamed. The wall was the real problem.
Safer Approach
A steadier approach is to pause at the opening itself. If there is movement, rot, or moisture damage, the install method often needs to change. This is where the cost difference between a quick swap and a durable repair starts to make sense. Not emotionally. Physically.
Mistake 3: Using An Insert Replacement Where The Surrounding Frame Or Wall Detail Is Already Compromised
Why It Happens
Insert or pocket replacements are less disruptive, and in the right opening they can work well. The trouble starts when they are used to solve problems they cannot actually reach: warped old frames, hidden rot, bad flashing, water-damaged sill framing, or old leakage paths buried behind cladding.
Early Warning Signs
- existing frame shows rot, softness, or long-term staining
- the old unit had ongoing drafts or leaks around the frame, not just at the sash
- exterior trim details already look patched, swollen, or repeatedly recaulked
- there is visible mold, peeling paint, or damp drywall at the lower corners
Worst-Case Outcome
The new insert performs better than the old sash, yet the underlying failure path remains in the wall. Water keeps entering around the old frame or failed flashing. Air keeps moving through hidden gaps. The result is a new window sitting inside an old problem.
Safer Approach
If the existing frame is sound and the issue is mostly worn sash performance, an insert can be sensible. If the signs point to frame damage, out-of-square conditions, or failed water management, a fuller replacement path tends to be safer because it allows inspection and repair at the rough opening rather than decoration over it.
Mistake 4: Skipping A Sloped Sill Pan Or Back Dam
Why It Happens
This detail is easy to underrate because it is hidden once the window is installed. Some teams assume the outer seal will stop all water. Real walls do not work that way. Small amounts of water can get past cladding, seals, or the window itself, especially during wind-driven rain. The sill area needs a way to drain outward, not a way to trap that water.
Early Warning Signs
- the sill is flat with no drainage logic
- there is no visible pan flashing, no back dam, or no sign of outward slope
- lower corners stain first after rain
- interior trim near the stool or apron shows swelling before other areas
Worst-Case Outcome
Water that gets into the opening stays there. Over time, that can lead to sill rot, mold, stained finishes, damaged insulation, and leakage into the wall cavity. It is a quiet failure for a while. Then it is not.
Safer Approach
A sill should be treated as a drainage surface, with a sloped pan or equivalent detail and a back dam that discourages water from moving inward. This matters even more in exposed elevations, multi-story homes, and walls that see frequent wind-driven rain.

Mistake 5: Getting The Flashing And WRB Sequence Wrong
Why It Happens
Flashing errors often look minor in the moment: tape applied to dusty surfaces, poor adhesion in cold weather, missing head flashing, reverse laps, or housewrap and flashing installed in the wrong order. Yet water management relies on sequence. The lap direction has to encourage gravity to work in your favor.
Early Warning Signs
- flashing tape lifts at corners or wrinkles badly
- the top flap is trapped behind the wrong layer
- there is no drip cap or head flashing where the wall design calls for one
- leaks appear only during wind-driven rain, not every storm
Worst-Case Outcome
Water bypasses the face of the assembly and enters behind the trim or cladding. At that point, a fresh bead of caulk may slow symptoms without stopping the actual route. Caulk is a raincoat, not a roof.
Safer Approach
A safer installation respects shingle-style layering: lower layers drain first, upper layers overlap them, and the head detail sends water back out over the surface instead of into the wall. If the opening is dusty, damp, or cold enough to affect adhesion, the flashing detail is already at risk before the siding goes back.
Mistake 6: Treating Sealant As The Main Defense Instead Of One Part Of The Joint
Why It Happens
Sealant is visible, familiar, and fast. That makes it tempting to use more of it than the joint design was ever meant to rely on. A wide, irregular gap gets filled with a fat bead and the install looks finished. The problem is that sealant moves, ages, cracks, and depends on proper joint size, adhesion, and backing.
Early Warning Signs
- thick exterior caulk lines that vary a lot in width
- sealant smeared over trim transitions as a patch
- voids behind the bead because no backer rod was used where needed
- recurring service calls that end with “just recaulk it again”
Worst-Case Outcome
The opening may look watertight for one season, then reopen under sun, cold, and movement. Drafts return. Water finds the weak edge. Maintenance turns into a loop, and the real defect stays buried.
Safer Approach
Sealant works better when the joint is already reasonably uniform, supported, and compatible with the surrounding materials. It is part of the system, not the whole system. If a bead looks like it is being asked to solve framing, flashing, and alignment all at once, the joint is carrying too much risk.
Mistake 7: Using The Wrong Insulation Method Around The Frame
Why It Happens
This is one of the most frequent mix-ups. Fiberglass gets stuffed into the perimeter gap and assumed to be airtight. Or high-expansion foam is used because it seems more thorough. The first method often leaves air paths. The second can bow jambs, distort frames, and block drainage where water still needs an escape path.
Early Warning Signs
- the sash rubs after the foam cures
- locks no longer align cleanly
- the lower corners feel cold even after the gap was “insulated”
- weep paths or sill drainage areas get clogged by foam or sealant
Worst-Case Outcome
You end up with both kinds of failure: air leakage because the gap was never truly sealed, and functional trouble because the frame was pushed out of shape. In wet conditions, blocked drainage can turn a comfort issue into a moisture issue.
Safer Approach
The safer move is to match the material to the joint. Low-expansion window-and-door foam, backer rod with sealant, or other flexible air-sealing methods tend to fit better than a one-material-for-everything approach. If the detail depends on drainage, the seal belongs where it will not choke that path.
Mistake 8: Fastening The Window Before The Shimming And Operation Checks Are Truly Finished
Why It Happens
Once the unit is in the opening, there is a natural urge to secure it and move on. Yet fastening changes geometry. A bent fastener, uneven shim pressure, or over-tightened screw can pull the frame slightly off center. That slight shift may be almost invisible and still enough to affect weatherstripping compression.
Early Warning Signs
- the window operated well before final fastening but not after
- diagonal measurements changed during installation
- latches need extra force
- one sash corner compresses weatherstripping more than the opposite corner
Worst-Case Outcome
The unit closes, though not evenly. That causes localized drafts, premature wear on hardware, water entry at stressed corners, and repeated call-backs that never fully solve the problem.
Safer Approach
A steadier method is to keep checking for level, plumb, square, centering, and smooth operation as fastening proceeds, not just before it. In smaller projects, one missed check may affect one room. In larger replacement jobs, the same rushed habit can repeat across the whole house.
Mistake 9: Closing The Opening Up Before Testing, Inspecting, And Protecting The Exterior Details
Why It Happens
Interior trim and exterior capping make a project feel complete. That visual finish can arrive before anyone has done a disciplined check for smoke movement, water path issues, blocked weeps, missing head details, or trim and cladding conditions that direct water back toward the frame.
Early Warning Signs
- no post-install check beyond opening and closing the sash
- no smoke-pencil, blower-door, or careful hand check for air movement
- drip edges, cladding clearances, or top trim details look decorative rather than functional
- the first real “test” is simply waiting for bad weather
Worst-Case Outcome
Small defects stay hidden until finishes are back in place and the easiest repair window has passed. Then the project shifts from clean correction to diagnosis through finished surfaces: removing trim, chasing stains, opening drywall, and sorting out who owns the failure.
Safer Approach
A better close-out checks the installation while the details are still visible. If air movement is suspected, a smoke-pencil or pressure test can reveal it. If rain management is the concern, the head, jamb, sill, trim, and cladding transitions deserve one more look before the assembly disappears behind finish work.
Symptom Map: What The House Is Telling You
| Symptom | Likely Oversight | Why It Is Often Misread |
|---|---|---|
| Cold air at the lower corners | Poor rough-opening air seal, missing interior seal, or fibrous insulation used as the only barrier | People often blame the glass package when the leak is really around the frame. |
| Leak only during wind-driven rain | Flashing sequence error, weak head detail, reverse lap, or failed WRB integration | Because the leak is weather-dependent, it can seem random or “mysterious.” |
| Window binds after a few days | Over-foaming, uneven shimming, or frame pulled out of square during fastening | The unit may have operated correctly before final fastening or before foam cured. |
| Paint bubbles or trim swelling at the stool | Flat sill, trapped water, missing back dam, or ongoing leakage into the lower opening | It is easy to blame interior humidity when the damage starts inside. |
| Repeated need for recaulking | Joint design is wrong and sealant is being used as the entire weather strategy | Fresh caulk changes the appearance, so it can look like a repair even when nothing structural changed. |
| Fog-free glass but persistent discomfort near the window | Perimeter air leakage rather than glass seal failure | People often connect comfort complaints only to glazing performance. |
A recurring blind spot: condensation on interior surfaces can be a humidity issue, an air leakage issue, or both. If warm indoor air reaches a cold edge because the perimeter seal is weak, the symptom may look like a “leak” even when liquid water first formed by condensation.
General Risk Patterns That Repeat Across Projects
The Drainage Pattern
Water is assumed to be fully blocked at the exterior face, so no drain-back path is built in. This is where missing sill slope, missing back dam, clogged weeps, and bad flashing sequence tend to travel together.
The Tolerance Pattern
The opening is imperfect, and the install relies on sealant, foam, or trim to hide too much correction. That usually leads to drafts first and functional issues second.
The Wrong-Method Pattern
A project that really needs opening repair gets treated like a simple replacement. If you are working on an older house, a stucco wall, a brick veneer, or a facade with earlier moisture history, this pattern shows up more often than people expect.
The False-Diagnosis Pattern
Air leakage, rain entry, and condensation are grouped together, so the repair targets the visible symptom rather than the path behind it. That is why a window can be recaulked several times and still feel cold, damp, or unreliable.
FAQ
Can a brand-new window still cause drafts?
Yes. New glass and new weatherstripping do not solve a weak perimeter joint by themselves. Drafts often come from the rough opening, poor shimming, a distorted frame, or an incomplete interior air seal rather than the sash alone.
Is caulk enough to stop window leaks?
Sometimes it helps at the outer edge, though it is rarely enough when the leak is caused by missing flashing, bad lap sequence, trapped water at the sill, or movement in the opening. Caulk can finish a correct detail. It does not replace one.
What is the difference between air leakage and water intrusion around a window?
Air leakage is uncontrolled air movement through gaps in the assembly. Water intrusion is rain or bulk water entering the wall or interior. Condensation is different again: indoor moisture turning to liquid on a cold surface. They can overlap, which is why diagnosis gets muddled.
Are insert replacement windows more likely to leak?
Not automatically. They can perform well when the existing frame and surrounding wall details are sound. Risk rises when an insert is used to cover a frame that is warped, rotted, out of square, or already tied to a flashing problem.
What should be checked before trim and capping go back on?
Operation, alignment, perimeter air sealing, sill drainage logic, flashing adhesion, head detail, weep-path clearance, and any sign that the opening itself is wet or deteriorated. Once finish materials return, simple verification becomes much harder.
{
“@context”: “https://schema.org”,
“@type”: “FAQPage”,
“mainEntity”: [
{
“@type”: “Question”,
“name”: “Can a brand-new window still cause drafts?”,
“acceptedAnswer”: {
“@type”: “Answer”,
“text”: “Yes. New glass and new weatherstripping do not solve a weak perimeter joint by themselves. Drafts often come from the rough opening, poor shimming, a distorted frame, or an incomplete interior air seal rather than the sash alone.”
}
},
{
“@type”: “Question”,
“name”: “Is caulk enough to stop window leaks?”,
“acceptedAnswer”: {
“@type”: “Answer”,
“text”: “Sometimes it helps at the outer edge, though it is rarely enough when the leak is caused by missing flashing, bad lap sequence, trapped water at the sill, or movement in the opening. Caulk can finish a correct detail. It does not replace one.”
}
},
{
“@type”: “Question”,
“name”: “What is the difference between air leakage and water intrusion around a window?”,
“acceptedAnswer”: {
“@type”: “Answer”,
“text”: “Air leakage is uncontrolled air movement through gaps in the assembly. Water intrusion is rain or bulk water entering the wall or interior. Condensation is different again: indoor moisture turning to liquid on a cold surface. They can overlap, which is why diagnosis gets muddled.”
}
},
{
“@type”: “Question”,
“name”: “Are insert replacement windows more likely to leak?”,
“acceptedAnswer”: {
“@type”: “Answer”,
“text”: “Not automatically. They can perform well when the existing frame and surrounding wall details are sound. Risk rises when an insert is used to cover a frame that is warped, rotted, out of square, or already tied to a flashing problem.”
}
},
{
“@type”: “Question”,
“name”: “What should be checked before trim and capping go back on?”,
“acceptedAnswer”: {
“@type”: “Answer”,
“text”: “Operation, alignment, perimeter air sealing, sill drainage logic, flashing adhesion, head detail, weep-path clearance, and any sign that the opening itself is wet or deteriorated. Once finish materials return, simple verification becomes much harder.”
}
}
]
}