A room can look freshly painted and still feel off. That is the trap with interior finishes: most paint failures do not begin as dramatic disasters; they begin as small choices that seem harmless at the time—using the same sheen everywhere, trusting a tiny swatch, rushing the second coat, or treating trim, walls, and ceilings as if they all behave the same way. Paint is the last skin on the room, so when the finish goes wrong, it exposes every shortcut underneath.
Interior painting looks simple because the tools are familiar. A roller, a brush, a tray, a weekend. Yet the finish people notice weeks later is shaped by adhesion, surface texture, porosity, lighting, humidity, sheen, cure time, and the order of work. That is why many disappointing paint jobs are not really color problems. They are system problems wearing a color problem’s costume.
What makes this risky? Interior finishes tend to fail in slow, visible ways: flashing on patched walls, drag marks on trim, uneven sheen in hallways, peeling around doors, scuffs that will not clean, or ceilings that make the whole room look unfinished. None of these usually ruin the house. They can still waste time, paint, labor, and trust in the final result.
Common Assumptions That Lead to Bad Interior Finishes
- “If the color looks good, the finish will look good.” Color and finish are different decisions. A nice hue in the wrong sheen can make patched areas, roller texture, and wall waves far more visible.
- “Paint-and-primer means primer is never needed.” In many rooms, patched spots, stains, raw surfaces, repaired corners, and drastic color shifts still benefit from a separate primer coat.
- “More paint fixes coverage faster.” Thick coats often create sagging, slow drying, ridges, and a swollen-looking surface rather than cleaner coverage.
- “Dry means done.” A surface can feel dry to the touch long before it is ready for scrubbing, tape, furniture contact, or repeated touch-ups.
- “Walls are the project.” In real rooms, trim, doors, ceilings, baseboards, corners, and fixed finishes decide whether the paint job feels finished or amateur.
| Surface or Decision | What Often Gets Missed | First Visible Warning | Worst Plausible Outcome |
|---|---|---|---|
| Walls | Patch repairs, sheen choice, wet-edge control | Flashing, lap marks, uneven color depth | The room looks blotchy even after two coats |
| Trim and Doors | Brush quality, leveling, cure time | Ridges, drag marks, tacky feel | High-touch areas chip or show every stroke |
| Ceilings | Paint order, roller control, glare | Spatter, missed cut lines, shiny patches | The whole room feels unfinished from above |
| Color Sampling | Lighting changes, undertones, fixed surfaces | Color shifts from morning to night | A full room repaint after the color goes up |
| Drying and Curing | Recoat timing, cleaning too early | Soft film, marking, peeling with tape | Fresh paint gets damaged before it hardens |
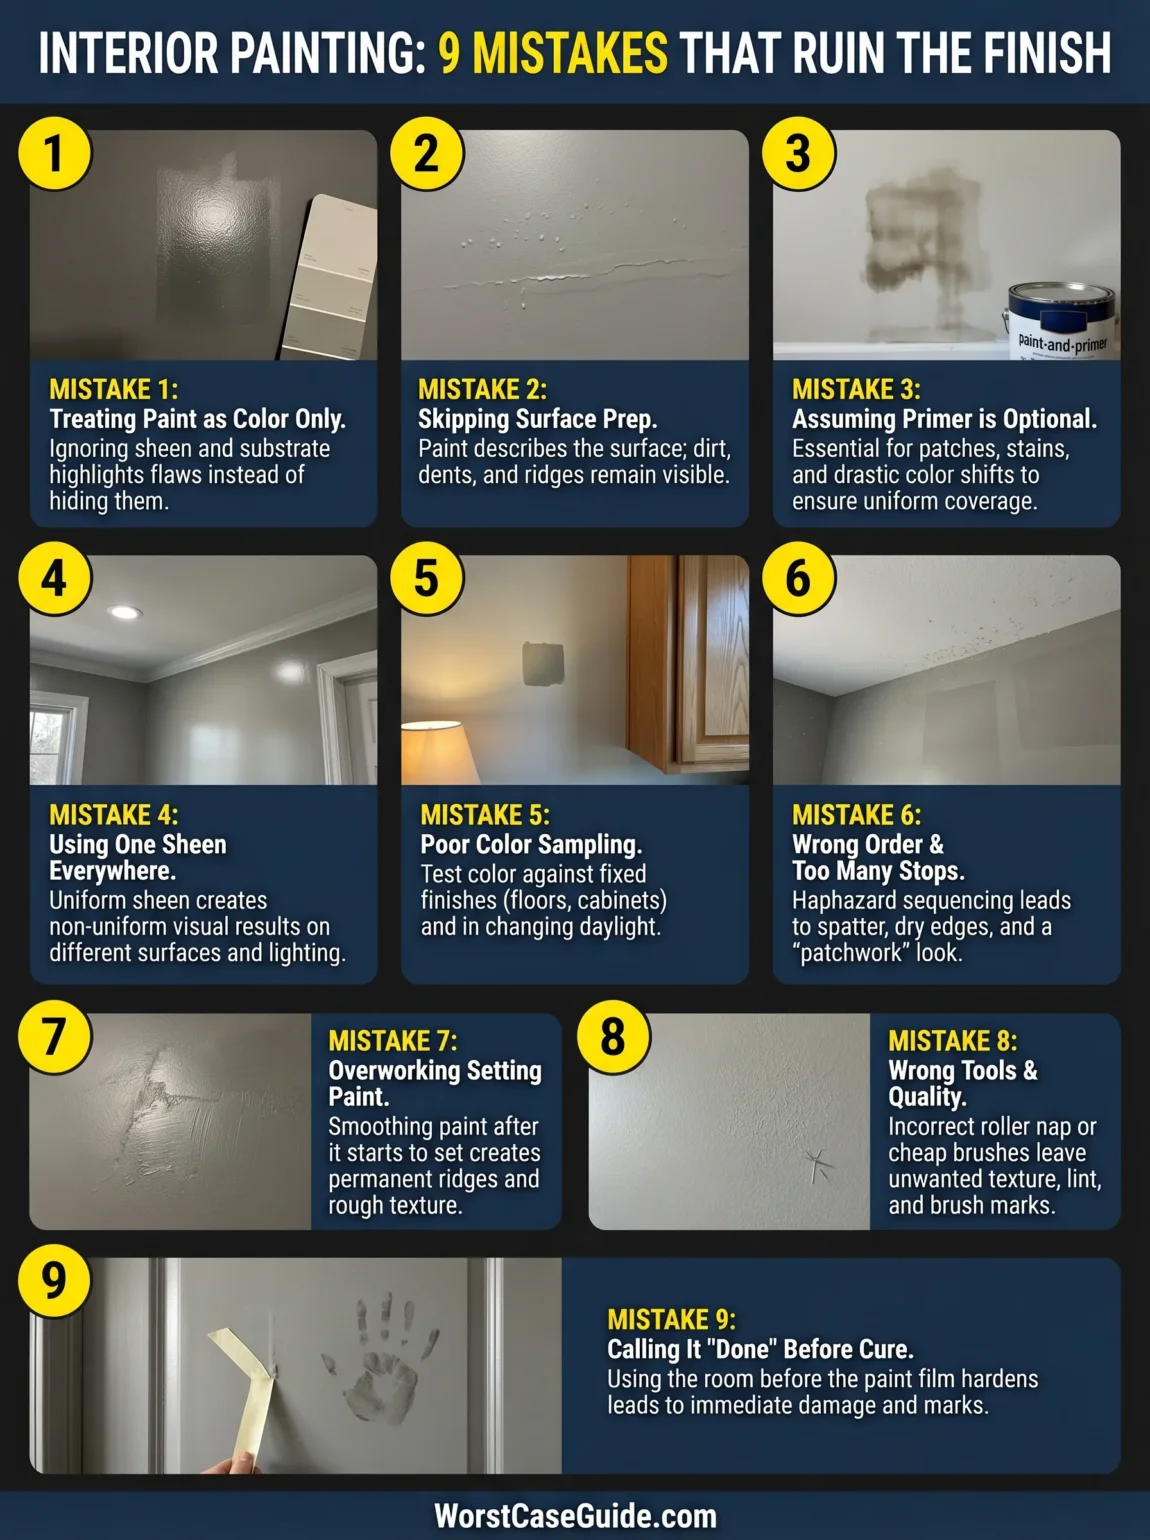
9 Painting Mistakes That Ruin Interior Finishes
Mistake 1: Treating Paint as a Color Choice Only
Many people choose paint the way they choose a shirt: they focus on the color first and assume the rest will fall into place. In interior finishes, that shortcut often backfires. Paint color, sheen, substrate, and room use all interact. A flattering wall color in a glossy finish may highlight old patchwork, roller stipple, and every dent in the drywall.
Why It Happens
Color chips and online mockups make selection feel simple. The finish decision comes later, almost as an afterthought. In smaller rooms that may seem manageable. In larger open spaces, hallways, stairwells, and rooms with side lighting, it usually catches up fast.
Early Warning Signs
- The same color looks elegant on one wall and harsh on another.
- Patched areas show up only after paint dries.
- Trim feels much shinier or flatter than expected beside the wall color.
- The room looks different under daylight, lamps, and overhead fixtures.
Worst-Case Result
The room gets fully painted, but the finish draws attention to flaws rather than softening them. At that point, the fix is rarely a tiny touch-up. It often means changing sheen, repainting larger areas, or revisiting surface prep that should have happened first.
A Safer Approach
Choose color and finish together, not in separate steps. Think in surface terms: walls, ceilings, trim, doors, built-ins. If the walls are imperfect, a flatter finish may hide more. If the room is high-touch, a mid-sheen may age better. The room’s lighting and the texture already on the wall should be part of the decision, not an afterthought.
Mistake 2: Skipping Surface Prep Because the Wall “Looks Fine”
Interior paint is unforgiving in a quiet way. It does not merely cover the wall; it often describes it. Dust, grease, hairline dents, filler ridges, sanding scratches, and old caulk lines may look minor before painting, then stand out once fresh paint levels across the surface.
Why It Happens
Prep work feels slow and invisible. Cleaning, patching, sanding, spot-priming, and recaulking do not deliver the emotional reward of seeing color go on the wall. So people trim that part first. Then the finish records every shortcut like wet cement taking a footprint.
Early Warning Signs
- Light grazes across the wall and reveals waves, bumps, or filled holes.
- Old stains or repaired areas absorb paint differently.
- Baseboards and trim lines look rough even before the topcoat dries.
- Caulk gaps reopen around trim, corners, or crown details.
Worst-Case Result
The room ends up with a fresh color over a visibly tired surface. That is one of the more frustrating outcomes because the labor and paint have already been spent, yet the finish still looks unfinished. On repaired walls, the patches can become more visible after painting than they were before.
A Safer Approach
Prep should match the surface, not just the schedule. Walls near kitchens, bathrooms, entries, kids’ rooms, and stair rails often need more cleaning and closer inspection. Trim usually benefits from attention to old caulk lines, dust, and minor chips. If a surface already has dents, raised seams, glossy spots, or old repairs, paint should not be expected to solve them by itself.
Mistake 3: Assuming Primer Is Optional in Every Room
Primer is easy to dismiss because many modern paints advertise paint-and-primer convenience. That wording is helpful in some cases, but it can create a false sense of security. Primer and topcoat do different jobs. One helps create a stable base; the other delivers the visible finish.
Why It Happens
People hear “self-priming” and translate it as “primer never matters.” That works better on already sound, similar-color surfaces. It works far less well on new patches, repaired corners, stains, bare wood, old gloss, strong color changes, smoke residue, or surfaces with uncertain coating history.
Early Warning Signs
- Patched areas flash duller or shinier than the surrounding wall.
- Color depth varies from one section to another.
- The old color still reads through in corners or high spots.
- Trim paint scratches off more easily than expected.
Worst-Case Result
The finish looks uneven even after more coats. In harder cases, adhesion becomes the hidden problem: peeling around tape lines, chipping on trim, or poor bonding over glossy or stained surfaces. The job becomes longer and more expensive because the missing layer has to be corrected after the room is already painted.
A Safer Approach
If the project includes repaired drywall, raw material, stubborn stains, unknown existing coatings, or a major shift from dark to light, a separate primer layer often lowers risk. In older interiors, compatibility matters more than marketing language. A finish coat can only be as calm as the surface under it.
Mistake 4: Using One Sheen Across Walls, Trim, Ceilings, and Doors
This is one of the most common finish killers because it sounds efficient. Buy one product, one sheen, one workflow. Simple. Yet interior surfaces do not live the same life. Ceilings deal with light and shadow. Walls deal with wear and viewing angle. Trim and doors deal with hands, scuffs, and close inspection.
Why It Happens
Uniformity feels safe. It also feels cheaper and easier to manage. Still, uniform product selection often creates non-uniform visual results. A sheen that hides wall imperfections nicely may feel too flat and fragile on trim. A sheen that works on trim may throw glare across imperfect drywall or ceilings.
Early Warning Signs
- Ceiling patches catch light in a way the rest of the ceiling does not.
- Wall touch-ups flash at a different angle.
- Doors and casings look dull, scuffed, or hard to wipe clean.
- The room feels visually noisy because different surfaces bounce light in awkward ways.
Worst-Case Result
The finish feels wrong even when the color is right. That can be harder to diagnose than a bad color choice because people sense the room is off without immediately knowing why. In practical terms, that leads to more repainting on trim, doors, or ceilings than expected.
A Safer Approach
It helps to match sheen to surface condition, lighting, and how the room is used. In many homes, ceilings benefit from lower reflectivity, walls from a balanced sheen that can handle normal wear, and trim or doors from a tougher, easier-to-clean finish. If the room has raking light, textured drywall, or repaired areas, sheen choice matters even more.
Mistake 5: Sampling Color in Only One Light and Against No Fixed Finishes
Paint does not live on a swatch. It lives next to floors, counters, tile, stone, wood tones, fabrics, and hardware. It also changes character from morning to afternoon to night. A color that feels calm at noon can look washed out, muddy, green, pink, or oddly cold by evening.
Why It Happens
Sampling often gets treated as a quick approval step rather than a stress test. People glance at a chip in the store, or paint one small square on a wall, then decide too quickly. That is usually where undertones start winning quietly.
Early Warning Signs
- The sample looks warm on one wall and gray on another.
- Trim white suddenly looks yellow, blue, or pink beside the wall color.
- Flooring or cabinetry begins to clash after the first coat.
- The room feels darker or more reflective than expected.
Worst-Case Result
A full room repaint happens not because the chosen color was ugly in general, but because it was wrong for that room. This is common in spaces with strong daylight shifts, north-facing light, warm artificial lighting, or fixed finishes that cannot be changed easily.
A Safer Approach
Color should be checked in the room where it will live and beside the surfaces that will stay: flooring, counters, tile, trim, and upholstery. Morning light, evening light, lamp light, and hallway spill light can all tell a different story. If the room has a lot of permanent warm materials, a cool paint may feel harsher than it looked in isolation.
Mistake 6: Painting in the Wrong Order and Breaking the Room Into Too Many Stops
Some finish problems are not about product at all. They are sequencing problems. Painting walls before a messy ceiling pass, cutting in the whole room hours before rolling, or jumping between trim and walls without a clear order can turn an ordinary project into a patchwork of overlaps, spatter, and dry edges.
Why It Happens
People often work in the order that feels emotionally satisfying, not the order that leaves the cleanest result. Starting with the most visible wall sounds natural. So does cutting in every edge first. In practice, sequence controls cleanup, blending, and line sharpness.
Early Warning Signs
- Fresh walls get spotted while the ceiling is being painted.
- Cut lines dry before the roller reaches them.
- Trim lines need repeated correction.
- Different sections of the same room look like they were painted on different days.
Worst-Case Result
The room develops a pieced-together look: fuzzy lines at the ceiling, different texture near corners, and visible transitions between sections. On larger rooms, open-plan areas, or long hallways, that broken rhythm can stay visible long after the paint dries.
A Safer Approach
In many interiors, work is calmer when it moves top down and in connected sections rather than scattered touch points: ceiling, then walls, then trim and doors. On each wall, cutting in and rolling while the edge is still open tends to reduce visible framing and lap marks. If a project must be split across days, natural break points matter.
Mistake 7: Overworking the Paint After It Starts Setting
This one often comes from good intentions. A small streak appears, a roller line looks too visible, a brush mark catches the eye, and the instinct is to keep smoothing. Then the surface begins to set and the finish turns rougher, not better. That is how many lap marks, ridges, drag marks, and uneven texture patterns are born.
Why It Happens
Fresh paint invites correction. It looks workable right up until it stops being workable. Temperature, airflow, humidity, absorbent patches, and paint load all change that window. In rooms with fans running, direct heat, or very porous repairs, the working time can shrink more than expected.
Early Warning Signs
- The roller begins to pull instead of glide.
- Brush strokes stop leveling.
- One section looks dull while the next still looks wet.
- Going back over a spot leaves a darker or shinier patch.
Worst-Case Result
The wall dries with visible bands, framing near the edges, rough stipple, or patches that reflect light differently. On trim and doors, the same mistake can leave obvious brush texture and ridges that feel cheap up close.
A Safer Approach
Interior finishes usually look better when paint is laid on evenly and then left alone soon enough. A steady wet edge matters more than heroic correction. If a section has already started setting, it is often safer to let it dry fully and assess it later than to keep chasing perfection while the film is half-open.
Mistake 8: Using the Wrong Roller Nap, Brush Type, or Tool Quality for the Surface
Tool choice changes finish texture more than many people expect. Not every roller cover lays paint the same way. Not every brush leaves the same edge. And not every wall, trim profile, or door panel wants the same tool. A poor match can make decent paint look mediocre.
Why It Happens
Buying paint feels like the main decision, so the roller and brush become an afterthought. Sometimes people use whatever is left from an older project. Sometimes they choose by price alone. That can show up immediately in lint, brush marks, stipple, missed recesses, or overloaded corners.
Early Warning Signs
- The roller leaves pronounced texture on smooth walls.
- Trim strokes stay visible instead of settling.
- Lint, fuzz, or stray bristles appear in the finish.
- Corner coverage feels clumsy and uneven.
Worst-Case Result
The final surface looks more textured, striped, or brushy than planned. On modern interiors with flat light and simple trim, that mismatch is easy to spot. On doors and built-ins, the finish can look especially disappointing because those surfaces are viewed from close range and touched often.
A Safer Approach
It helps to think in terms of surface profile and finish goal. Smooth walls often need a different roller approach than textured walls. Narrow trim profiles do not behave like broad flat baseboards. Doors, casing, built-ins, and detailed millwork often reveal tool choice quickly, so they deserve their own plan rather than leftovers from the wall setup.
Mistake 9: Calling the Job Finished Before the Paint Has Cured
This is the mistake that turns a decent-looking finish into a fragile one. The paint may feel dry, so the room goes back into service too soon: furniture slides into place, tape gets applied, shelves go back up, doors close tightly, surfaces get wiped, and small corrections begin before the film has hardened.
Why It Happens
“Dry” sounds like completion. It is not. Many interior coatings continue hardening after they no longer feel tacky. High-touch areas such as trim, doors, hand-height walls, and hallways are where that misunderstanding shows first.
Early Warning Signs
- The surface marks easily with light pressure.
- Fresh paint sticks to weatherstripping, shelving, or door stops.
- Cleaning leaves rub marks or dull spots.
- Tape lifts or imprints the finish.
Worst-Case Result
Edges peel, trim gets dented, doors block, or scrubbing wears the finish before it has settled. That is especially frustrating because the visible damage arrives after the painting stage is supposedly over. In busy homes, one rushed day of use can create a week of touch-ups.
A Safer Approach
Painted surfaces usually benefit from being treated as newly installed finishes for a short period, not as fully hardened room parts. High-touch surfaces deserve the most patience: trim, doors, stair rails, cabinet-like built-ins, and hall walls. When the room must return to use quickly, planning around cure time matters almost as much as planning around color.
General Risk Patterns Behind Most Interior Paint Failures
When these mistakes are lined up, a pattern appears. Most bad finishes do not come from one dramatic error. They come from one of three repeat problems.
1. The Surface Was Judged Too Optimistically
If the wall, trim, or ceiling was treated as “good enough” before painting, the finish usually reveals that optimism later. This is common with patch repairs, glossy older trim, stained areas, and rooms with years of invisible grime.
2. The Room Was Treated as One Surface Instead of Many
Walls, ceilings, trim, doors, and built-ins do not need identical products or identical timing. In smaller projects, that simplification can still look acceptable. In larger systems—open-plan interiors, long hallways, rooms with sharp daylight, or homes with older surfaces—it tends to fall apart.
3. Speed Took Priority Over Finish Control
Rushed sequencing, skipped prep, thick coats, early recoats, and early use all come from the same impulse: finish faster now and fix later if needed. Interior paint rarely rewards that trade. It often turns one short gain into several rounds of correction.
A practical way to think about risk: if a choice affects adhesion, reflectivity, or cure time, it is probably more important than it first appears. Those three forces shape how the finish looks on day one and how it behaves once the room is lived in.
FAQ
What painting mistake shows up fastest on interior walls?
Skipping prep usually shows up first. Dust, greasy spots, patch repairs, and sanding flaws often become easier to see once fresh paint dries and light moves across the wall.
Does the wrong sheen really ruin a room’s finish?
It can. The wrong sheen may highlight wall defects, make touch-ups flash, create too much glare, or leave trim and doors harder to maintain. A color can be right while the finish still feels wrong.
Why do patched areas stand out after painting?
Patched areas often absorb and reflect paint differently from the surrounding surface. Without proper sanding, feathering, and, in many cases, spot priming, those repairs can remain visible under the topcoat.
Is interior paint ruined if the second coat goes on too soon?
Not always, but the risk rises. Recoating too early can lead to dragging, poor leveling, soft film, or uneven sheen. The problem is usually worse on trim, doors, repaired areas, and rooms with limited airflow.
Which surfaces need the most patience after painting?
Trim, doors, baseboards, stair rails, and other high-touch areas usually need the most patience because they are handled, bumped, cleaned, and closed against other materials before the finish has fully hardened.