Material selection is one of the few decisions in a home project that becomes hard to undo once work starts. A paint choice can be repainted. A wrong substrate behind tile, a mismatched adhesive, or a floor that can’t tolerate the room’s conditions can quietly turn into rework, delays, and messy compromises. The risk isn’t “catastrophe.” It’s the slow kind: hidden incompatibilities, premature wear, and repairs that cost more than the original upgrade.
Home projects also sit at the intersection of materials science, installation technique, and real-life use. Many mistakes happen because a material “looks right” or seems like a direct replacement, while the underlying requirements—moisture tolerance, movement, bonding, temperature, cleaning chemicals—are different than expected.

What makes this topic uniquely risky: material choices often lock in a chain of other choices—fasteners, adhesives, thickness, transitions, underlayment, waterproofing, and maintenance. If the first link is wrong, everything downstream becomes a workaround.
Common Assumptions That Create Material Risk
- “If it’s sold for this use, it must be compatible with my situation.”
- “A thicker / stronger material is always better.”
- “Indoor materials behave the same in kitchens, bathrooms, basements, and entryways.”
- “The installer will ‘make it work’ if something is slightly off.”
- “If two products are from the same brand, they’ll bond and perform together.”
- “Maintenance won’t matter much after the job is done.”
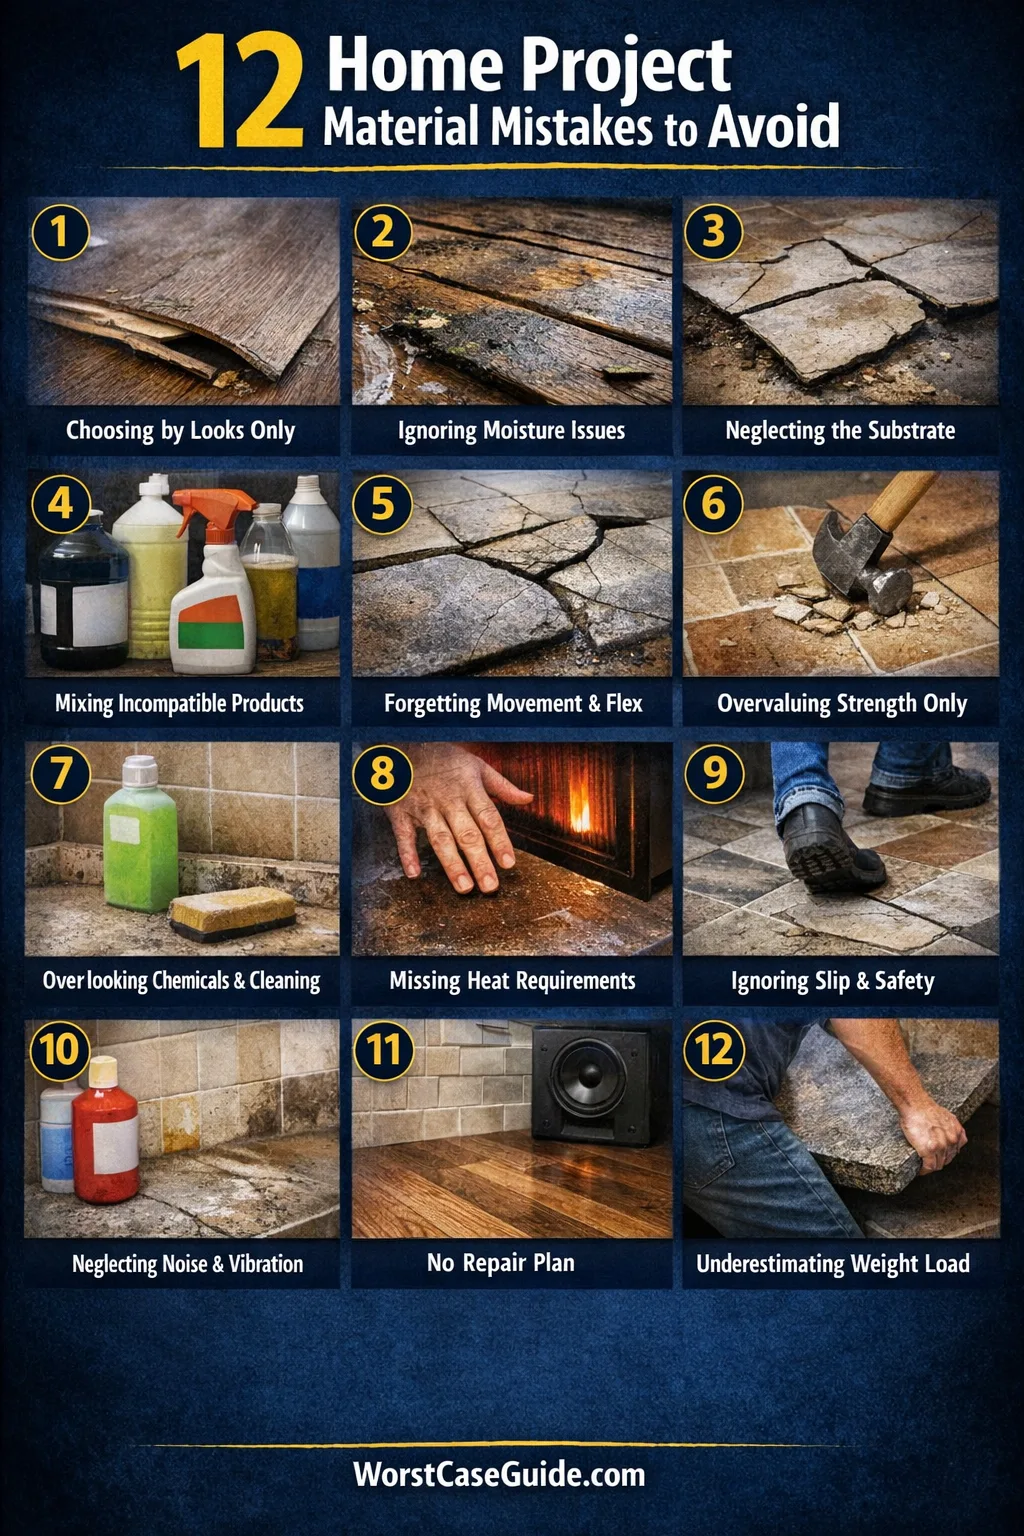
Mistake 1: Choosing By Appearance Instead Of Performance Conditions
Why it happens: finish samples and mood boards emphasize color, texture, and style, while the room’s stressors (humidity swings, grit, heat, splashes, pets) are invisible.
Early warning signs: the material is described mainly with aesthetic terms; performance specs feel vague; nobody can clearly answer how it behaves with water or abrasion.
Worst-case result: surfaces wear unevenly, stain easily, swell, or delaminate. The project “looks finished” but becomes high-maintenance or needs partial replacement sooner than expected.
A safer approach: treat appearance as the last filter. First define the room’s conditions: moisture exposure, traffic level, cleaning habits, sunlight, and temperature swings. If you are in a kitchen or entryway, “good enough” materials often fail through abrasion and grit; in a bathroom or basement, they fail through moisture and movement.
Mistake 2: Underestimating Moisture And Vapor Movement
Why it happens: people think “water” only means visible leaks. Many failures come from vapor, condensation cycles, and slow wetting that never looks dramatic—until materials swell or mold-like odors appear.
Early warning signs: a room has a history of damp smells, cold surfaces, or seasonal humidity swings; the plan relies on “it will dry out”; waterproofing is treated as optional because nothing is “directly getting wet.”
Worst-case result: floor edges curl, trim gaps open, cabinets warp, finishes blister, or adhesives lose bond. In smaller projects, the loss may be localized. In larger systems (full basements, whole-room tile), the result can be systemic failure requiring tear-out.
A safer approach: separate “splash zones” from “vapor zones.” Even if you never see standing water, some assemblies need moisture-tolerant substrates, compatible membranes, and materials that can handle repeated wet/dry cycling.
Mistake 3: Treating Substrates As An Afterthought
Why it happens: the visible finish gets attention, while the substrate is assumed to be interchangeable. Many finish materials rely on a specific flatness, stiffness, and surface chemistry to perform.
Substrate reality check: the finish is often the least forgiving layer. If the substrate moves, stays damp, or isn’t flat enough, the finish becomes the indicator—cracks, hollow spots, popped grout, squeaks, telegraphing seams.
Early warning signs: phrases like “we’ll level it later,” “it’s close enough,” or “adhesive will fill the gaps”; no one measures flatness; existing layers are left because removal is inconvenient.
Worst-case result: premature cracking, bond failures, and a finish that cannot be repaired cleanly without disturbing adjacent areas. The cost isn’t just materials—it’s the demolition and reinstallation sequence.
A safer approach: treat substrate selection and prep as part of material selection. If you are installing rigid finishes (tile, stone, large-format panels), substrate stiffness and flatness can be the difference between years of stability and recurring repairs.
Mistake 4: Mixing Products That Are Not Designed To Work Together
Why it happens: it’s tempting to combine “best-of” components from different systems—membrane from one brand, adhesive from another, primer from a third—assuming function is generic.
Early warning signs: the plan includes a lot of “equivalents”; compatibility is based on forum anecdotes; warranty language is ignored; the installer plans to adjust ratios or cure times.

Worst-case result: bond failures, chemical incompatibility, or cure inhibition that only appears weeks later. Troubleshooting becomes hard because responsibility is fragmented.
A safer approach: if you are building an assembly (waterproofing + adhesive + finish), consider staying within a tested system for critical layers. In smaller projects, experimentation can be manageable. In larger systems, a single incompatibility can affect the whole surface.
Mistake 5: Ignoring Movement, Expansion, And Structural Flex
Why it happens: walls and floors feel solid, so movement feels theoretical. In reality, homes move: temperature changes, moisture content, settling, vibration, and load changes.
Early warning signs: long unbroken runs of rigid material; minimal gaps; “tight” installs around edges; a belief that more fasteners or more adhesive eliminates movement.
Worst-case result: cracking, tenting, buckling, or joint separation. The finish may look fine at handover and then fail after seasonal cycles, which makes the outcome feel mysterious.
A safer approach: choose materials and details that allow controlled movement: appropriate expansion gaps, flexible transitions where needed, and finishes matched to the building’s behavior. If you are renovating an older home, movement tolerance can matter more than “premium” labels.
Mistake 6: Choosing “Stronger” When The Real Need Is “More Compatible”
Why it happens: strength is easy to picture, compatibility is not. People upgrade to harder finishes, higher-strength adhesives, or rigid panels assuming durability increases automatically.
Early warning signs: selection logic is based on one attribute (hardness, thickness, tensile strength) while ignoring the assembly; “commercial grade” is treated as universally better.
Worst-case result: a stronger material transfers stress to weaker layers, causing cracks or debonding elsewhere. The failure moves from “surface wear” to structural stress within the assembly.
A safer approach: think in layers. A material that is slightly “less strong” but more tolerant of movement, moisture, or substrate variation can be safer over time than an ultra-rigid upgrade.
Mistake 7: Not Matching Materials To Real Cleaning And Chemical Exposure
Why it happens: maintenance gets planned emotionally (“we’ll keep it clean”) rather than practically (“what cleaning products and habits will actually happen”). Some finishes are sensitive to acids, abrasives, bleach, steam, or frequent mopping.
Early warning signs: the finish requires “special cleaners”; the household uses strong products routinely; the room is a high-splash area; the plan assumes perfect wipe-ups.
Worst-case result: etched surfaces, dull patches, sticky residue buildup, grout discoloration, or coating breakdown that looks like “defect” but is actually chemical mismatch.
A safer approach: align the material with realistic cleaning behavior. If you are choosing a finish for a rental, a busy family kitchen, or a mudroom, “forgiving” maintenance characteristics can be more protective than high-end aesthetics.
Mistake 8: Missing Heat And Temperature Requirements
Why it happens: indoor spaces feel temperature-controlled, so thermal limits get ignored. Radiant floors, sun-facing rooms, near-stove walls, fireplaces, attic-adjacent ceilings, and garages create localized heat or big swings.
Early warning signs: “it’s inside, so it’s fine”; materials are selected without checking temperature range; adhesives and coatings are applied outside recommended conditions.
Worst-case result: softening, creep, discoloration, warping, or adhesive failure. The project may look fine until a heat wave, a sunny season, or repeated heating cycles create progressive distortion.
A safer approach: identify heat sources and solar load early. If you are in a sun-heavy room, heat tolerance and dimensional stability can matter as much as moisture tolerance.
Mistake 9: Misjudging Slip, Grip, And “Real-World” Surface Safety
Why it happens: slip resistance is hard to evaluate from a sample. A surface that feels fine dry may become slick when wet, soapy, dusty, or greasy.
Early warning signs: selection is based on gloss level alone; wet-area floors are chosen from showroom touch; the project includes stairs or thresholds without thinking about traction.
Worst-case result: increased fall risk and constant annoyance (people avoid the area, place rugs everywhere, or change behavior). The material becomes a daily friction point, not a feature.
A safer approach: consider how the surface behaves under the worst normal condition: wet feet in bathrooms, snow melt in entryways, cooking oil in kitchens. If you are in a high-traffic home, subtle texture can be more valuable than a perfectly smooth finish.
Mistake 10: Overlooking Acoustic Behavior And Vibration
Why it happens: sound is rarely tested in planning. Hard surfaces reflect noise; some floor assemblies transmit footsteps; thin underlayments can exaggerate impact sounds.

Early warning signs: open-plan layouts with more hard finishes; upstairs floors installed without acoustic thinking; the plan assumes furniture will “absorb it.”
Worst-case result: echoey rooms, amplified footsteps, rattling fixtures, and complaints from neighbors or family members. Fixes often involve adding layers after the fact, which is inefficient.
A safer approach: match materials to how sound should behave in the space. In smaller projects, soft finishes and strategic textiles can help. In larger systems, underlayment and decoupling decisions are part of “material selection,” not accessories.
Mistake 11: Selecting A Material Without A Repair And Replacement Path
Why it happens: the focus is “install day.” Some materials are easy to patch; others require replacing large sections to fix a small issue, especially when dye lots, patterns, or finishes vary over time.
Early warning signs: long lead times, limited suppliers, frequent product changes, or the material is known for batch variation; no one plans for spare stock.
Worst-case result: minor damage triggers major work. Repairs look mismatched, or the only option is full replacement. The home becomes “precious” in the wrong way—owners avoid using the space normally to protect a finish that is hard to service.
A safer approach: consider repairability as a core spec. If you are choosing patterned surfaces, unique colors, or specialized coatings, a realistic plan includes how repairs will look and how replacements will be sourced later.
Mistake 12: Underestimating Weight And Load Implications
Why it happens: “it’s just a finish” sounds harmless. But heavier materials (stone, thick tile, large-format panels, solid surfaces) can change handling, fastening, and structural requirements, especially on walls, ceilings, or older floors.
Early warning signs: no one discusses load paths; wall assemblies are assumed to hold anything; the plan relies on “extra screws” instead of a designed system.
Worst-case result: sagging, cracked substrates, fastener failure, or long-term deflection that shows up as cracks and gaps. Even if nothing “falls,” the finish can gradually telegraph stress through joints.
A safer approach: treat heavier materials as a structural question, not only a style upgrade. If you are upgrading from lightweight to heavyweight finishes, the safer path often includes substrate reinforcement and appropriate attachment systems.
Quick Compatibility Table For Common Home Project Surprises
| Decision Point | What People Assume | What Often Fails | Safer Question To Ask |
|---|---|---|---|
| Wet Area Floor | “Indoor flooring is indoor flooring.” | Swelling, slippery surface, adhesive breakdown | “How does it behave under repeated wet/dry cycles?” |
| Tile Assembly | “Any backer board works.” | Cracks from movement, hollow spots, grout failure | “Is the substrate flat and stiff enough for this tile?” |
| Coating / Paint | “More coats = more durability.” | Peeling from prep mismatch, staining, cure issues | “What surface prep and primer compatibility does it require?” |
| Sun-Heavy Room | “It won’t get that hot.” | Warping, fading, creep | “What’s the temperature range and dimensional stability?” |
| High-Traffic Entry | “Harder = lasts longer.” | Scratching, grit wear, visible dulling | “How does it handle abrasion and cleaning frequency?” |
Risk Patterns That Show Up Across Most Material Failures
- Invisible stressors beat visible beauty. Moisture, movement, temperature, and cleaning chemistry decide longevity more than looks.
- Assemblies fail, not single products. A great finish can fail on the wrong substrate or with a mismatched adhesive.
- “Overbuilding” can be risky. Extra rigidity or strength can shift stress into weaker layers and create new failure modes.
- Maintenance assumptions are usually optimistic. Real cleaning habits quietly rewrite the performance requirements.
- Irreversibility is the real cost. The worst-case isn’t drama; it’s being locked into a finish that is annoying or expensive to repair.
FAQ
How can someone tell if a material is “wrong for the room” before installing it?
Early clues often come from missing specifics: vague performance data, unclear compatibility with moisture, or no mention of temperature range. If you are in a bathroom, basement, or entryway, a useful check is whether the product documentation addresses wet/dry cycles, vapor exposure, and cleaning frequency in plain terms, not just marketing labels.
Is it risky to mix brands for membranes, adhesives, and finishes?
It can be, because systems are often tested as a set. In smaller projects, mixing may be workable when compatibility is clearly documented. In larger systems, a single mismatch can cause hard-to-diagnose bond or cure problems, and warranties may not apply when products are combined across systems.
What is the most common hidden cause of early failure in finishes?
Substrate issues. A finish can fail even if the finish itself is high quality. Problems like insufficient flatness, unexpected flex, trapped moisture, or incompatible primers and adhesives often show up later as cracks, hollow spots, or peeling.
Does “waterproof” always mean safe for bathrooms and basements?
Not always, because “waterproof” can describe the surface while ignoring edges, seams, or vapor behavior underneath. In vapor-prone spaces like basements, the safer framing is whether the entire assembly handles moisture migration, not only splashes.
How does repairability change what material is “safe” to choose?
Repairability changes the downside. If a finish is hard to patch or likely to change in color or pattern over time, small damage can force large replacement areas. If you are choosing distinctive materials, a practical hedge is having a clear replacement path and spares that match the original run.